'본좌급 분류'에 해당되는 글 168건
- 2010.07.27 xgrafix 사용하기.
- 2010.07.21 Micro quad - wii copter 만들기 #2 schematic & 준비물
- 2010.07.21 Micro quad - wii copter 만들기 - 센서 샘플링에 대한 discuss
- 2010.07.21 micro qaud - wii copter 를 만들기 시작.#1
- 2010.07.16 아두이노 wmp 소스
- 2010.07.02 우분투에서 피카사 쓰기..(picasa)
- 2010.06.28 안드로이드 소스 빌드...(ver 0.1)
- 2010.06.28 리눅스에서 originPro 와 같은 그래프 그려주는 프로그램...
- 2010.06.28 리눅스에서 매트랩을 이용하기...(gnuOctave...)
- 2010.06.25 gsl 의 사용 (우분투)
xgrafix 사용하기.
리눅스 2010. 7. 27. 14:23
리드미 파일을 잘 읽어보면 된다.
############################
# Dependencies:
############################
building and running xgrafix/xoopic depend on the following headers/libraries/programs:
X11, Xpm, Tcl/Tk, gcc, imagemagick, bison
optional xoopic dependencies:
Fortran Compiler for fortran libraries
MPI for parallel runs
HDF5 for parallel or high performance dump files
libpng for png
fftw
fftw3
dependencies can be installed on Ubuntu (or likely any Debian based distro) with the command:
sudo aptitude install gcc g++ build-essential automake \
tk-dev imagemagick bison libx11-dev libxpm-dev libpng-dev \
fftw-dev libfftw3-dev h5utils hdf5-tools libhdf5-serial-*\
the first two lines are necessary, the last installs optional fftw/hdf5 dependencies
On Fedora, these dependencies can be installed with:
sudo yum install gcc gcc-gfortran gcc-c++ automake libX11-devel libXpm-devel \
ImageMagick bison tk-devel libpng-devel \
hdf5 hdf5-devel
On SUSE, install the following packages with YAST:
gcc gcc-c++ gcc-fortran automake xorg-x11-devel make
tk-devel bison libpng-devel imagemagick hdf5 hdf5-devel
##################
# Configure / build/ install
##################
For a new install:
edit the run_conf.sh file to match your system. For a basic install, the only
thing you are likely to edit is `prefix` - the install location.
then you can do:
sh run_conf.sh # configure the build
make # build the program
# or, if you have a multiprocessor machine, this can go faster with:
make -j 4 #(that's 4 threads, you can do as many or as few as you want)
# If you are building xgrafix, do:
make install # sudo make install if you need root privileges to write to $prefix/{bin|lib|include}
test the xgrafix build with:
./ctest/xtest # from the xgrafix root dir.
Once you have built and installed xgrafix, you can build xoopic. run_conf.sh is the same for
both xoopic and xgrafix, so if you configured run_conf.sh in xgrafix, use the same one in xoopic.
The process to build xoopic is the same as xgrafix, except skip the 'make install' step, since you only
need the binary file in 'xg/xoopic'. You can test xoopic with:
./xoopic -i input/ebeam1a.inp # from the xoopic root dir
once xoopic is done, you can install it with:
cp xoopic $prefix/bin/
where prefix is defined as in:
prefix=/usr/local # to install for all users
or
prefix=$HOME # to install just for you (assuming ~/bin is already in your path)
Micro quad - wii copter 만들기 #2 schematic & 준비물
쿼드콥터-완성/wii콥터 2010. 7. 21. 13:53
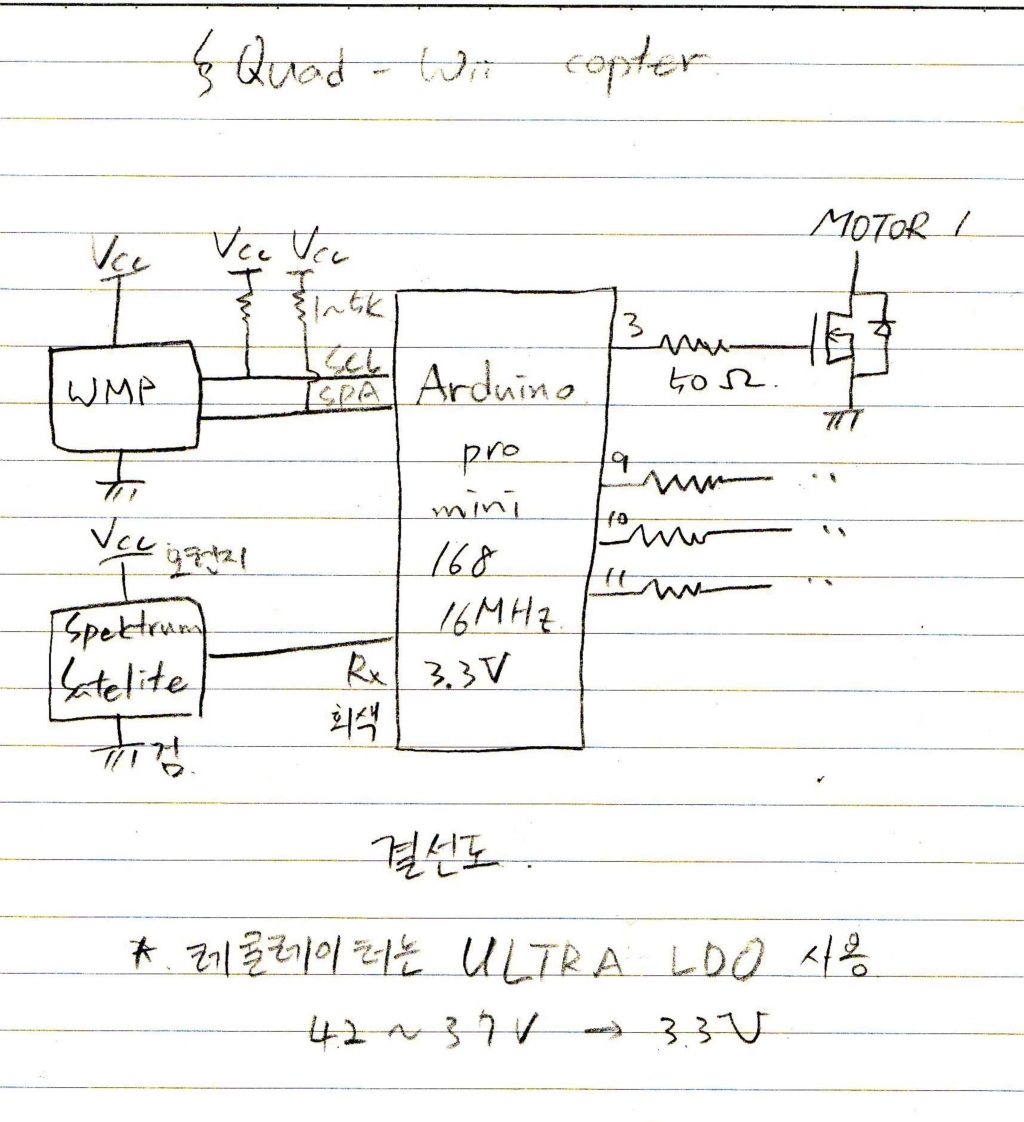
구상한 회로도이다.
필요한 준비물
아두이노 프로 미니 보드 - 19불 -> 23000원
만능 pcb(18 x 18) - 1000원
모션 위 플러스 - 15000원
리폴 1셀 138mA - 1.3불 - 1600원
기어드 브러쉬 모터(GPS-6) x4 - 18.2불 - 22000원
프롭 GWS4025 x 10 - 2.6불 - 3100원
스펙트럼 위성 수신기 - 36불 - 43200원
기타 코넥터 및 케이블 - 10불 - 12000원
도합 : 12만9백원(수신기를 재활용하면 77,700원)
기타 필요한 기자재
FTDI 케이블 - 15불 : 18000원
스펙트럼 조종기(dx7 이상) - 200불 - 24만원
Micro quad - wii copter 만들기 - 센서 샘플링에 대한 discuss
쿼드콥터-완성/wii콥터 2010. 7. 21. 13:43
두 가지 물음을 해보자.
2. 100Hz 의 주파수에 해당하는 PWM 으로 구동하는 모터의 경우에
100Hz 이상의 대역폭을 가진 센서는 무용지물인가?
첫번째 답은 틀렸다..가 확실하다. 최대한 높은 sps(sample per second) 의 adc로 샘플링 해주고 그 데이터를 50Hz LPF 로 변환하여 읽어준 값이 정확한 센서값이 될 것이다. 따라서 비록 자이로의 밴드폭이 60Hz 에 해당한다고 하더라도 sps 는 크면 클 수록 좋다.
두번째 답은, 맞다라고 생각하지만 정확하지는 않다. 센서값중 100hz 이상의 값은 무용지물임은 틀림 없다. 따라서 이때에도 최대한 높은 sps 를 가진 adc로 샘플링을 해주고 100Hz 의 LPF 를 처리해준 값으로 모터를 컨트롤하는게 타당하다고 본다.
micro qaud - wii copter 를 만들기 시작.#1
쿼드콥터-완성/wii콥터 2010. 7. 21. 12:27
동기
tri- wii copter 에 자극을 받아, micro quad-wii copter 를 만들기 시작했다.
전체 디자인.
1. ARDUINO PRO MINI 보드를 메인보드로 삼고, 가속도 센서는 사용하지 않으며,
-> WII MOTION PLUS 에 내장된 3축 자이로 센서를 쓰기로 결정(15천원)
비록 DELAY 가 있지만, TWI 인터페이스를 그대로 사용하기로 결정
2. 3개의 브러쉬리스 모터 + 1서보 모터 대신 -> 4개의 브러쉬 모터를 사용 (간단하게 구현
-> 이를 위하여 4개의 PWM 이 필요하나, ARDUINO 에서 제공하는 내장 함수 analogWrite() 펑션을 사용하기로 하였다.이를 위해서는 제약이 있는데 매뉴얼에 따르면 490Hz 정도 구동이며, 3,5,6,9,10,11 핀 중 하나를 써야한다.
3. 4개의 핀으로 조종기 신호를 받아들이는 대신, 스펙트럼 수신기의 위성 수신기를 사용하기로 함
-> 장점은 3.3V 구동이 가능하며 직렬 통신(115200bps) 를 사용하므로 빠른 통신이 가능
-> 경량화 가능하며 가지고 있는 수신기 활용할 수 있음
-> 이를 위해 MikroCopter 의 소스를 참조하기로 하였다.
4.전원은 리폴 1셀로 구현.
-> 스위치는 IRMLML2502 mosfet n-ch 으로 결정(Vgs 3.3V로 스위칭 가능한 장점, 3A, 20V)
-> 메인보드의 경우 atmega328P은 1.8~5.5V에서 ~20MHz 까지 지원
-> 위 모션 플러스의 경우에도 3.3V 구동 가능
-> 수신기의 전원 또한 3.3V
-> 이를 위하여 ultra LDO 가 필요하였다. SPX3819 로 결정(340mV dropout at full load)
리폴1셀의 전압을 4.2V ~ 3.7V 까지만 사용하기로 하였을 때에 3.3V 출력 가능
5. 모터는 하비시티에서 판매중인 Micro Power system w/ Gearbox GPS-6 으로 결정
thrust 가 16g 이므로 x4 => 64g.
조종을 위해 기체의 무게를 32g 이하로 맞춰야 한다.
(모터2g+프롭(-gws4025)1.3g) x4 = 13.2g
메인보드+wii motion plus = 6.8g
base plate + 수신기 = 15.2g
배터리 = 3.5g
기타 잡자재 = 5g
총 38.6g 으로 6.6g 오버하지만, 경량화 등으로 해결 가능해 보임
아두이노 wmp 소스
MCU 및 PLD 2010. 7. 16. 18:19
#include <Wire.h>
byte data[6]; //six data bytes
int yaw, pitch, roll; //three axes
int yaw0, pitch0, roll0; //calibration zeroes
void wmpOn(){
Wire.beginTransmission(0x53); //WM+ starts out deactivated at address 0x53
Wire.send(0xfe); //send 0x04 to address 0xFE to activate WM+
Wire.send(0x04);
Wire.endTransmission(); //WM+ jumps to address 0x52 and is now active
}
void wmpSendZero(){
Wire.beginTransmission(0x52); //now at address 0x52
Wire.send(0x00); //send zero to signal we want info
Wire.endTransmission();
}
void calibrateZeroes(){
for (int i=0;i<10;i++){
wmpSendZero();
Wire.requestFrom(0x52,6);
for (int i=0;i<6;i++){
data[i]=Wire.receive();
}
yaw0+=(((data[3]>>2)<<8)+data[0])/10; //average 10 readings
pitch0+=(((data[4]>>2)<<8)+data[1])/10;
roll0+=(((data[5]>>2)<<8)+data[2])/10;
}
Serial.print("Yaw0:");
Serial.print(yaw0);
Serial.print(" Pitch0:");
Serial.print(pitch0);
Serial.print(" Roll0:");
Serial.println(roll0);
}
void receiveData(){
wmpSendZero(); //send zero before each request (same as nunchuck)
Wire.requestFrom(0x52,6); //request the six bytes from the WM+
for (int i=0;i<6;i++){
data[i]=Wire.receive();
}
yaw=((data[3]>>2)<<8)+data[0]-yaw0;
pitch=((data[4]>>2)<<8)+data[1]-pitch0;
roll=((data[5]>>2)<<8)+data[2]-roll0;
}
우분투에서 피카사 쓰기..(picasa)
리눅스 2010. 7. 2. 12:32
먼저 apt-get 을 이용해서 패키지를 설치하고 싶은 경우..
http://www.google.com/linuxrepositories/ubuntu704.html
를 따라한다.
설치하고 난 후에 다음과 같은 에러가 뜰 수 있다.
터미널에서 실행을 하려고 하면,
/ usr / bin / picasa: line 139: 4213 Segmentation fault "$ PIC_BINDIR" / wrapper check_dir.exe.so
/ usr / bin / picasa: line 175: 4316 Segmentation fault "$ PIC_BINDIR / wrapper" regedit / E $ registry_export HKEY_USERS \ S-1-5-4 \ \ Software \ \ Google \ \ Picasa \ \ Picasa2 \ \ Preferences \ \
같은 메세지가 나온다
이 때엔 다음과 같이 해준다. (띄어 쓰기에 유의하라)
rm-rf ~ /. picasa /
sudo sysctl -w vm.mmap_min_addr=0
실행이 되는데, 한글이 깨지는 문제가 발생한다면
프로그램->기타->피카사 폰트 세팅
에서 한글 폰트를 추가해준다.
안드로이드 소스 빌드...(ver 0.1)
리눅스 2010. 6. 28. 14:27
http://android.git.kernel.org/
참조..
우분투 상에선 다음을 참조하자.
이걸 다 깔아도 가끔식 안될 때가 있는데 git 코어가 안 깔려있을 경우이다.
참조..
우분투 상에선 다음을 참조하자.
Ubuntu Linux (32-bit x86)
To set up your Linux development environment, make sure you have the following:
- Required Packages:
- Git 1.5.4 or newer and the GNU Privacy Guard.
- JDK 5.0, update 12 or higher.Java 6 is not supported, because of incompatibilities with @Override.
- flex, bison, gperf, libsdl-dev, libesd0-dev, libwxgtk2.6-dev (optional), build-essential, zip, curl.
$ sudo apt-get install git-core gnupg sun-java5-jdk flex bison gperf libsdl-dev libesd0-dev libwxgtk2.6-dev build-essential zip curl libncurses5-dev zlib1g-dev
- You might also want Valgrind, a tool that will help you find memory leaks, stack corruption, array bounds overflows, etc.
$ sudo apt-get install valgrind
- Intrepid ( 8.10) users may need a newer version of libreadline:
$ sudo apt-get install lib32readline5-dev -->>> 이건 없는 파일인듯. 생략하자.
이걸 다 깔아도 가끔식 안될 때가 있는데 git 코어가 안 깔려있을 경우이다.
다음과 같은 에러 메시지가 나온다.
apt-get install git-core
Installing Repo
Initializing a Repo client
repo initialized in /mydroid
를 참조한다.
apt-get install git-core
를 해준다.
Installing Repo
Repo is a tool that makes it easier to work with Git in the context of Android. For more information about Repo, see Using Repo and Git .
- Make sure you have a~/bindirectory in your home directory, and check to be sure that this bin directory is in your path:
$ cd ~
$ mkdir bin
$ echo $PATH
- Download thereposcript and make sure it is executable:
$ curl http://android.git.kernel.org/repo >~/bin/repo$ chmod a+x ~/bin/repo
Initializing a Repo client
- Create an empty directory to hold your working files:
$ mkdir mydroid
$ cd mydroid
- Run "repo init" to bring down the latest version of Repo with all its most recent bug fixes. You must specify a URL for the manifest:
$ repo init -u git://android.git.kernel.org/platform/manifest.git - If you would like to check out a branch other than "master", specify it with -b, like:
$ repo init -u git://android.git.kernel.org/platform/manifest.git -b cupcake
- When prompted, configure Repo with your real name and email address. If you plan to submit code, use an email address that is associated with a Google account .
repo initialized in /mydroid
를 참조한다.
그런데 간단하게는 2,3번 절차에서
mkdir mydroid
cd mydroid
repo init -u git://android.git.kernel.org/platform/manifest.git
repo sync
cd mydroid
repo init -u git://android.git.kernel.org/platform/manifest.git
repo sync
로 끝낼 수도 있다.
다만 소스 크기가 매우 크므로 시간이 오래 걸린다.
도중에 멈춘 경우엔 다시
repo sync
를 입력하여 소스를 다운 받자.
다만 소스 크기가 매우 크므로 시간이 오래 걸린다.
도중에 멈춘 경우엔 다시
repo sync
를 입력하여 소스를 다운 받자.
Android Build System
안드로이드는 GNU 의 최신 버전의 make 를 사용한다.
# make -v
버전이 3.80 보다 작으면 업그레이드 해야한다.
Understanding the makefile
Makefile 엔 다음과 같은 정보를 담아야 한다.
Name: Give your build a name (LOCAL_MODULE := <build_name>).
Local Variables: Clear local variables with CLEAR_VARS (include
Files: Determine which files your application depends upon
(LOCAL_SRC_FILES := main.c).
Tags: Define tags, as necessary (LOCAL_MODULE_TAGS := eng development).
Libraries: Define whether your application links with other libraries
(LOCAL_SHARED_LIBRARIES := cutils).
Template file: Include a template file to define underlining make tools
for a particular target (include
정형적인 메이크 파일은 다음과 같다.
LOCAL_PATH :=
include
LOCAL_MODULE := <buil_name>
LOCAL_SRC_FILES := main.c
LOCAL_MODULE_TAGS := eng development
LOCAL_SHARED_LIBRARIES := cutils
include
(HOST_)EXECUTABLE, (HOST_)JAVA_LIBRARY, (HOST_)PREBUILT,
(HOST_)SHARED_LIBRARY,
(HOST_)STATIC_LIBRARY, PACKAGE, JAVADOC, RAW_EXECUTABLE,
RAW_STATIC_LIBRARY,
COPY_HEADERS, KEY_CHAR_MAP
Layers
빌드는 아래 테이블에 기술된 추상화된 계층을 포함하는 구조로 이루어진다.
@@Layer (Example) -------
Description
@@Product (myProduct,
myProduct_eu, myProduct_eu_fr, j2, sdk )
-------- The product layer defines a complete specification of a
shipping product, defining which modules to build and how to configure
them. You might offer a device in several different versions based on
locale, for example, or on features such as a camera.
@@Device (myDevice,
myDevice_eu, myDevice_eu_lite) --------- The device layer represents the
physical layer of plastic on the device. For example, North American
devices probably include QWERTY keyboards whereas devices sold in France
probably include AZERTY keyboards. Peripherals typically connect to the
device layer.
@@Board (sardine,
trout, goldfish)
----------- The board layer represents the bare schematics of a product. You may still connect peripherals to the board layer.
----------- The board layer represents the bare schematics of a product. You may still connect peripherals to the board layer.
@@Arch (arm
(arm5te) (arm6), x86, 68k ) ----------The arch layer describes
the processor running on your board.
Building the Android Platform
이번 섹션은 안드로이드의 기본 빌드 방법에 대해 기술한다. 한번 이러한 빌드를 익힌 후면, 타겟 디바이스로의 수정도 가능하게
될거다.
Device Code
일반적인 빌드를 하기 위해서 build/envsetup.sh 의 소스엔 필요한 변수들을 담고 있다.
% cd
% . build/envsetup.sh
# pick a configuration using choosecombo
% choosecombo
% make -j4 PRODUCT-generic-user
eng 로 바꿔 쓸 수도 있다.
% make -j4 PRODUCT-generic-eng
이렇게 빌드 변수를 바꿔가면서 여러가지 디버깅 옵션을 줄 수 있다.
Cleaning Up
Execute % m clean to clean up the binaries you just created. You
can also execute % m clobber to get rid of the binaries of all combos. %
m clobber is equivalent to removing the //out/ directory where all
generated files are stored.
Speeding Up Rebuilds
각각의 combo 바이너리들은 분리된 sub-directories of //out/ 에 저장되어 있다. 이 바이너리들은 재
컴파일시에 빌드 타임을 단축시켜준다.
그러나, 환경 변수 등을 수정한 경우에는 완전 재빌드가 필요하다. 이러한 경우 USE-CCACHE 환경 변수를 다음과 같이
설정한다
% export USE_CCACHE=1
CCASH 는 //prebuilt/. 에 설치되어 있으므로 따로 설치할 필요가 없다.
Troubleshooting
The following error is likely caused by running an outdated version of
Java.
device Dex: core UNEXPECTED TOP-LEVEL ERROR:
java.lang.NoSuchMethodError: method java.util.Arrays.hashCode with
signature ([Ljava.lang.Object;)I was not found.
at com.google.util.FixedSizeList.hashCode(FixedSizeList.java:66)
at com.google.rop.code.Rop.hashCode(Rop.java:245)
at java.util.HashMap.hash(libgcj.so.7)
[...]
dx is a Java program that uses facilities first made available in Java
version 1.5. Check your version of Java by executing % java -version in
the shell you use to build. You should see something like:
java version "1.5.0_07"
Java(TM) 2 Runtime Environment, Standard Edition (build
1.5.0_07-164)
Java HotSpot(TM) Client VM (build 1.5.0_07-87, mixed mode, sharing)
Java 1.5 이상 버전에서는 이러한 error가 발생한다. 이 때에는 환경 변수에 PATH가 제대로 등록되어있는지 확인한다.
Building the Android Kernel
이번 섹션은 안드로이드의 기본 커널이 어떻게 빌드되는지 기술한다. 한번 이러한 빌드에 익숙해지면, 타겟 디바이스로의
수정도 가능하게 될것이다.
커널 베이스를 빌드하기 위해서 디바이스 디렉토리(/home/joe/android/device)를 바꿔준다.
% . build/envsetup.sh
% partner_setup generic
이 떄, 커널 디렉토리를 /home/joe/android/kernel 로 바꿔준다
Checking Out a Branch
기본 브랜치는 항상 안드로이드가 된다. 다른 브랜치를 체크하고 싶으면, 다음과 같이 실행하라.
% git checkout --track -b android-mydevice origin/android-mydevice
//Branch android-mydevice set up to track remote branch
% refs/remotes/origin/android-mydevice.
//Switched to a new branch "android-mydevice"
To simplify code management, give your local branch the same name
as the remote branch it is tracking (as illustrated in the snippet
above). Switch between branches by executing % git checkout
<branchname>.
Verifying Location
Find out which branches exist (both locally and remotely) and which one
is active (marked with an asterisk) by executing the following:
% git branch -a
android
* android-mydevice
origin/HEAD
origin/android
origin/android-mydevice
origin/android-mychipset
To only see local branches, omit the -a flag.
Building the Kernel
커널을 빌드하고 싶으면 다음과 같이 실행한다.
% make -j4
Build Variants
When building for a particular product, it's often useful to have
minor variations on what is ultimately the final release build. These
are the currently-defined build variants:
eng This
is the default flavor. A plain make is the same as make eng.
Installs modules tagged with: eng, debug, user, and/or development.
Installs non-APK modules that have no tags specified.
Installs APKs according to the product definition files, in
addition to tagged APKs.
ro.secure=0
ro.debuggable=1
ro.kernel.android.checkjni=1
adb is enabled by default.
user make
user
This is the flavor intended to be the final release bits.
Installs modules tagged with user.
Installs non-APK modules that have no tags specified.
Installs APKs according to the product definition files; tags are
ignored for APK modules.
ro.secure=1
ro.debuggable=0
adb is disabled by default.
userdebug make
userdebug
The same as user, except:
Also installs modules tagged with debug.
ro.debuggable=1
adb is enabled by default.
If you build one flavor and then want to build another, you should
run make installclean between the two makes to guarantee that you don't
pick up files installed by the previous flavor. make clean will also
suffice, but it takes a lot longer.
리눅스에서 originPro 와 같은 그래프 그려주는 프로그램...
리눅스 2010. 6. 28. 13:47
qtiPlot 이란 프로그램이 있다.
오리진프로와 거의 유사한 환경으로 플롯을 그릴 수 있다.
강추....
오리진프로와 거의 유사한 환경으로 플롯을 그릴 수 있다.
강추....
마찬가지로 "프로그램->우분투 소프트웨어 센터"
에서 qtiPlot 을 검색 후 설치.
리눅스에서 매트랩을 이용하기...(gnuOctave...)
리눅스 2010. 6. 28. 13:40
뭐 진짜 매트랩은 비싸서 못쓸 것이고,
리눅스 상에선 gnuOctave 란 프로그램이 있는데
매트랩 보다야 못하겠지만 매트랩과 거의 유사한 수준으로 호환된다.
m 파일을 지원한다고 하면 말 다했지..
콘솔 기반의 프로그램을 qt를 이용하여 GUI 를 구현한
QtOctave 를 깔아서 사용한다면 매트랩과 유사한 환경에서 실행해볼 수 있다.
우분투에서
"프로그램 -> 우분투 소프트웨어 센터"
qtoctave 검색
설치.
하면 된다..
gsl 의 사용 (우분투)
리눅스 2010. 6. 25. 20:30
먼저, 우분투 소프트웨어 센터에서
gsl binary package,
gsl development package,
gsl library package
를 선택해서 깐다
(필요 없는 것도 있을 것이나 일단 3개를 선택해서 깔아봤다)
여기 까지 깔면 컴파일해서 inclue 문제는 해결된다.
다만 링크 문제가 남는데
gcc example.c -lgsl -lgslcblas -lm
처럼 링크를 해주면 에러 없이 컴파일 된다.
다음은 예제이다.
http://www.gnu.org/software/gsl/manual/html_node/Eigenvalue-and-Eigenvector-Examples.html
#include <stdio.h>
#include <gsl/gsl_math.h>
#include <gsl/gsl_eigen.h>
int
main (void)
{
double data[] = { 1.0 , 1/2.0, 1/3.0, 1/4.0,
1/2.0, 1/3.0, 1/4.0, 1/5.0,
1/3.0, 1/4.0, 1/5.0, 1/6.0,
1/4.0, 1/5.0, 1/6.0, 1/7.0 };
gsl_matrix_view m
= gsl_matrix_view_array (data, 4, 4);
gsl_vector *eval = gsl_vector_alloc (4);
gsl_matrix *evec = gsl_matrix_alloc (4, 4);
gsl_eigen_symmv_workspace * w =
gsl_eigen_symmv_alloc (4);
gsl_eigen_symmv (&m.matrix, eval, evec, w);
gsl_eigen_symmv_free (w);
gsl_eigen_symmv_sort (eval, evec,
GSL_EIGEN_SORT_ABS_ASC);
{
int i;
for (i = 0; i < 4; i++)
{
double eval_i
= gsl_vector_get (eval, i);
gsl_vector_view evec_i
= gsl_matrix_column (evec, i);
printf ("eigenvalue = %g\n", eval_i);
printf ("eigenvector = \n");
gsl_vector_fprintf (stdout,
&evec_i.vector, "%g");
}
}
gsl_vector_free (eval);
gsl_matrix_free (evec);
return 0;
}
Here is the beginning of the output from the program,
$ ./a.out
eigenvalue = 9.67023e-05
eigenvector =
-0.0291933
0.328712
-0.791411
0.514553
...


